You know how at the end of most movies the boy realizes that the perfect girl was in front of his eyes the entire time and he was just too blind to see?
Well, this happened to me. Except I was the boy and my basement was the girl. Sounds a little out there, I know, but hear me out.
I was so desperate for an extra space in my home to host dinner parties. I’d looked at converting the spare bedroom or rearranging my living area, I even considered getting an extension.
But for the life of me, not for a second did it cross my mind to think about turning my dark and dingy basement into a guest area.
Honestly, it wasn’t even until I ventured into its admittedly creepy and scary depths, trying to find an old set of china I’d stored down there, that it dawned on me. I could turn this into something special if I put the work in.
I think when we move into a new home, we just chuck all the bits and pieces that don’t have a place in our home down there and completely overlook its untapped potential.
Then it gets grubby and gross and we think that’s all it could ever be. But, of course, it gets pretty battered over time when we treat it like the unwanted scraps of a dinner.
Pushed aside, given no love, and all but forgotten about.
But given the attention that it deserves, a basement can become a pretty special place. So in this article, I’m going to teach you how to give your basement floors the TLC they deserve.
You’ll be shocked at just how stunning they can turn out!
Step-By-Step Guide To Painting Concrete Basement Floors
Right, enough of my basement backstory now, let’s get straight into it. Below you’ll find all the steps you need to take to get that gross and grimy concrete floor looking like a showhome masterpiece.
Measure Your Room
Okay, so I used the Epoxyshield Garage Floor Coating Kit for the floors, but depending on how your space is, you might need a couple of them. So the first step is to measure out the exact measurements of the basement.
My basement measured out at around 1,500 square feet so I purchased 7 kits as a reference. However, I did have one kit leftover afterward.
But better to have and not need than to need and not have. So, I would always overestimate the number of kits, just in case.
You can find these kits on Amazon but they’re also pretty easy to pick up at any local Home Depot too. Just be sure that you take note of the tint color and ensure that it has been tinted.
I chose a light and bright paint color for my floor, but the world is your oyster. Go for whatever you’d like!
Tip – If you order the 2.5 kits online then you won’t need quite as many kits.
Get Surface Cleaning
Now, you won’t have much fun trying to use these kits on a dirty floor. And since basements tend to be the muckiest part of any home, you’ll need to spend some time giving it a little TLC.
So, you’ll need to clear the basement floor of any of the items that have built up in there. If you’re lucky enough to have not used it much then this won’t take all that long.
Unfortunately, if like me, you’ve hoarded quite the collection, you may need to dedicate some substantial time to this alone. Don’t worry though, it’s so worth it in the end.
Once you’ve got a clear floor, you’ll want to give it a good old sweep with a strong and sturdy broom.
When you’ve swept up the main bulk of dust and dirt, you can then go over the floors with a vacuum cleaner to ensure there’s nothing left behind.
Get Deep Cleaning & Degreasing
Once you’ve got a relatively clean floor, it’s time to deep clean it. For this part, I used CLOROX Professional Floor Cleaner & Degreaser but any dual cleaner and degreaser will do the job at hand.
All you’ll need to do is follow the instructions on the bottle that you use. But typically, it will involve you mixing the solution and some water in a large bucket.
Now, you don’t want to just pour this over the entire floor all at once or you’ll find yourself in a pretty messy situation.
Taking sections at a time, pour some of the solution onto the ground and use a sturdy deck scrub brush, and a whole lot of elbow grease, to remove any stubborn and lingering dirt and grime.
You may find that the section has a habit of drying up before you’re finished, nothing like being impatient, hey, if this happens just pour a small amount of water over them again.
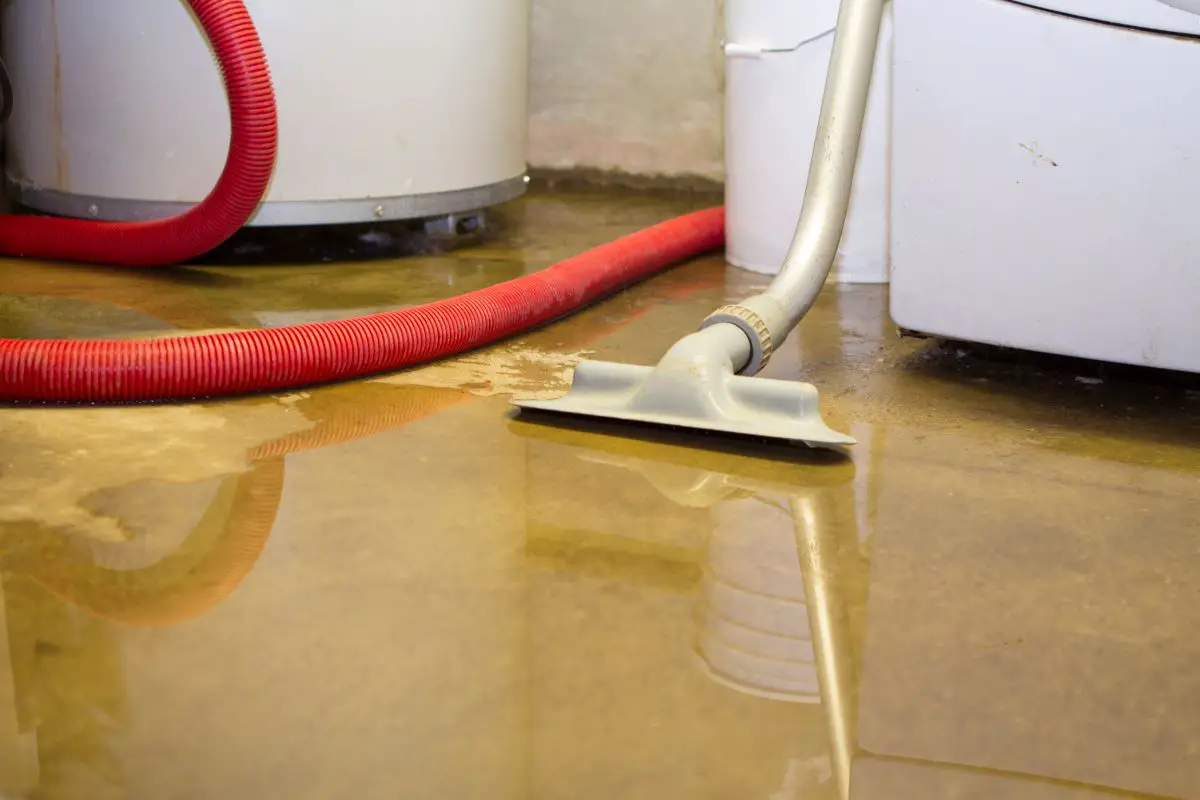
Squeegee & Vacuum Up The Dirty Water
By the time the entire floor is done, you’ll have quite a sizable puddle on your hand, but don’t worry, it’s to be expected.
This is where a floor squeegee will be your very best friend. You can use it to pool all the dirty water into a corner, and then from there, you can vacuum it all up.
And I won’t lie to you, I’ll put my hands up and say that this took me pretty much a full day to do. There’s quite a lot of vacuuming to be done to rid your basement floor of all that water.
It’s definitely not a quick job that can be done in a couple of hours. But hey, Rome wasn’t built in a day – it’ll be worth it, I promise.
Etch The Concrete Floor (Optional)
If you’re pushed for time, you can skip this step as it isn’t vital. With that being said though, it massively increases adhesion and durability so I would certainly recommend it.
What you’ll want to do is mix your bag of concrete etch (it will be provided in your kit) along with 2 gallons of water in a watering can until it dissolves completely.
Then with a hose, you need to pre-wet the basement floor. Then you can pour your etch solution on the floor too – just ensure that it is distributed nice and evenly.
Then with all your might, give the floors a good scrub with a bristle brush. Then you’ll need to go back with your squeegee and vacuum and repeat the same procedure as before. I know, I’m sorry.
Rise The Floor & Dry
Yep, again, I know. You need to do a final rinse with some water to ensure that you’ve removed any lingering solution. You’ll be a little sick of seeing those basement stairs, I’m sorry.
By this point, you know the drill. Get that squeegee and vacuum and get rid of any remaining water.
Once that is done and the floor is dry, you’ll need to gently rub your fingers across the floor. If your fingers are dusty or powdery, I have some bad news. You’ll need to do another rinse until your fingers come off clean.
Once there is no longer a dust particle in sight, you can get a few fans going to help exponentiate the drying process a little. Leave to dry for a minimum of 24 hours to dry completely.
Get Your Kits – Mix Part A & B
Hooray! It is finally time for the kits. So let’s rip them open and get started. You’ll need to activate the epoxy by mixing the two cans in your kit together.
Pour part A into the gallon can of part B. You then need to spend around 3-5 minutes making sure they are thoroughly mixed together.
You can do this as you wish, I tried with a stir stick, but that proved to be quite fruitless after a minute or two, so I swapped it out for a Paddle Paint Mixer Attachment that can be placed on a drill.
That’s definitely the easier option, but if you’re a lot stronger than me, you may be okay with a stir stick.
Once you’re all mixed up, you’ll want to follow the instructions on the kit to apply it and ensure it is applied within the time parameters stated.
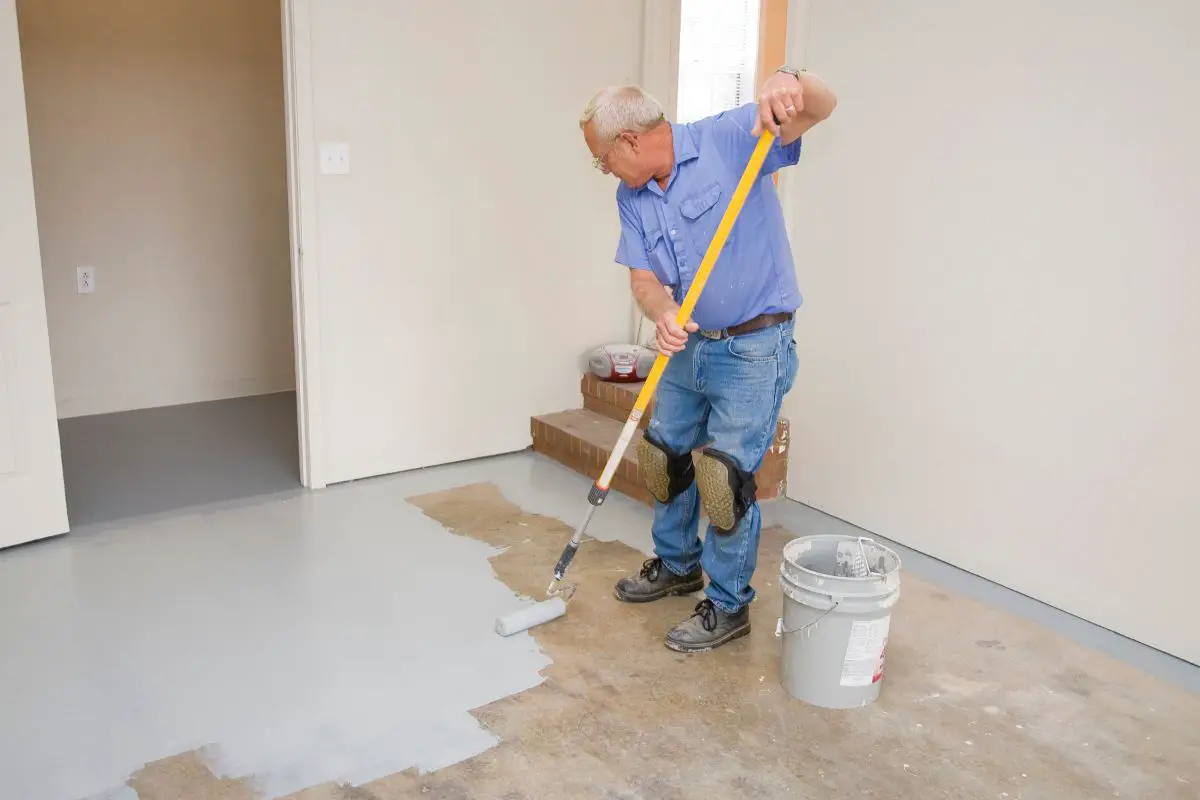
Apply Basement Floor Coating
When it comes to coating the floor, you’ll want to start in the corner that is the furthest away from the door.
Apply the coating in sections of 4×4 and use a synthetic brush when trimming the edges with the epoxy paint. For applying the paint to the floor, I used a ⅜ inch nap and a 9-inch roller frame.
Thankfully, you’ll only need one coat of this paint although it’s worth noting that with lighter tints may still show a few blemishes or marks.
So you may want a second coat with lighter colors. When your first coat is dry, wait around 24 hours, you can go over the blemishes and add the second layer and then allow a further 24 hours for it to dry too.
Bask In The Beauty Of Your Basement Floor
Woo! There you are! Just like that, you’re all done and you have transformed your basement floor into a thing of beauty. Give yourself a pat on the back for a job well done!
Frequently Asked Questions
What’s The Budget For Painting Your Basement Floors?
That will all really depend on how big your basement is along with the kits you opt for. However, for some context, my 1500 square foot basement floor cost a little more than $1300 in total.
I did already own a few of the tools that I needed though, such as the squeegee and the wet vacuum for example. If you’re kitting yourself out from scratch, you may be looking closer to the $2000 mark.
This might be a little more than you’ll actually need, but better to over budget and have money spare than to find yourself short.
Does Painting The Floor Make It Smell Bad Or Have Fumes?
Again, this will probably depend on the kit that you use. It will obviously smell a fair bit like paint, that’s kind of unavoidable, but I wouldn’t say it was overpoweringly so.
The best tip I could give is to crack open any windows you have and keep a couple of fans going to try and avoid things getting too fumigating.
The smell will also dissipate over time. Overall, I would say that yes there is a clear smell of paint while you’re doing it, but it’s not overwhelming.
It doesn’t have the same eye-watering pungency of an oil-based primer though.
How Have The Painted Basement Floors Held Up?
So, have they stood the test of time? Yes! Pretty well actually. It’s been a good few years now since I renovated my basement and there are no signs of any imminent redecorating on the cards.
It doesn’t look quite as crystal clean as it did the very first day after I’d finished the project, but it’s nothing that a good old scrub wouldn’t sort out.
How Long Did It Take You To Do?
I’d say the whole process took around a week to complete fully. It may take you a little less time though, as I dedicated an entire day just to remove all the items that were collecting dust in my basement.
I then spent a further day surface cleaning and a couple more on all the squeegee and vacuuming. Then you need to leave the floor for 24 hours to dry.
So all in all, I would recommend dedicating at least 5 days if not more to transforming your basement.
Final Thoughts
As far as tasks go, I won’t lie, it isn’t the quickest process in the world. But it is definitely worth it once you reach that glorious end product.
And what is one week compared to having a gorgeous new home addition indefinitely?
And while it may be a little repetitive and time-consuming, it is thankfully super easy to do. You definitely won’t be struggling while doing so.
And as long as you get blasting your favorite songs and really get into the task at hand, it can actually be a lot of fun.
Hopefully, from reading this article, you now have a much clearer understanding of how to go about turning a dingy, dark, and boring basement floor into something that can be a real thing of beauty.
So whether you want a little home cinema, a play area for the kids, or a place to host your parties and soirees like me, get in that unloved and ignored basement and give it the true tender loving care that it deserves.
Like me, I’m sure you’ll be blown away by the transformation. Just tell your guests you did it at your own peril, my presence is now constantly requested for every DIY project that they embark on.
I hope you enjoy transforming your home! Happy DIY-ing!
I’m Ida Oliveira, and now I want to impart my knowledge of all things interior design onto you. If you’re going through the same process of designing your house, I want to help.
So, I hope that you’ll find everything you need to know on my website. If I make the process even a little easier and more fun for you, Alexander and Pearl will have done its job.

![ow To Design A Room Like An Interior Designer [Step By Step]](https://alexanderandpearl.co.uk/wp-content/uploads/2022/02/How-Much-Does-A-Pop-Up-Camper-Weigh-33.jpg "How To Design A Room Like An Interior Designer [Step By Step]")

")

")


